

Ever think about how master wood finishers get the mirror-like completion you find on wooden furniture? It isn’t by hurriedly slapping on a coat or two of standard-issue polyurethane varnish. There are various steps included, starting with the way the piece is initially built on through a few layers of clear complete and last hand-rubbing. In the middle of, there’s the immensely essential stride of filling the wood grain pores to deliver the consummately level surface that gives the last clear complete profundity and a glass-smooth sparkle. Everbuild 2 Part Wood Filler assures to help you fix the need as simplest as its required. What’s more, on the off chance that you’ve never utilized wood grain filler, here are a couple filler actualities to help you see why.
To allay any confusion that may arise, let me make it clear that Wood putty and Wooden Grain are entirely two different things. Wood putty (or wood filler) is a much thicker blend, and is utilized to fill bigger brakes and voids in the wood. Grain filler is a fastener blended with a filler material, for example, silica, “smaller scale inflatables”, dirt, or calcium carbonate to for a slight glue. Most grain fillers are generally the consistency of flapjack player, making them simple to work into the grain of the wood, yet at the same time sufficiently thick to flow through and fill the open pores of the grain.
There are two primary types of wood grain filler: Oil-based or waterborne. Oil-based filler is quite old and comes with pristine finishing. Waterborne wood grain fillers being the new chips of the block, however are quickly picking up support as a result of the simple cleanser and water tidy up and extraordinarily abbreviated drying time it offers.However, waterborne finish might sound to be an “all in one” solution for your needs, however that is not the case. A waterborne filler can be utilized under any unmistakable finish, and is entirely finicky than an oil-based filler with regards to tolerating the final clear finish.
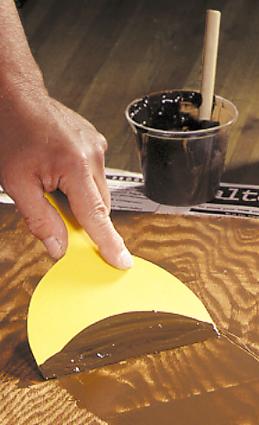
Fillers are generally simple to use but there is something else that needs to be looked into: getting the shading right. What’s more, taking care of business the first run through is vital. Application shifts some from filler to filler, yet when all is said in done, you trowel or brush the filler on, squeegee or wipe of the excess, sit tight for it to dry, and sand it level with the surface of the wood.
Most wooden grain fillers may not necessarily clean the stain as exceptionally as you’d expect but keep note of the amount of filler you push into the grain of wood shouldn’t it mess up.
Most grain fillers are either tinted to copy the shade of different woods, or arrive in an obscure “unbiased” shading. With a misty filler, you’re just about ensured to need to do a bit of tweaking of the shading to get the impact you need.